Last edited:

Pawn Tactics Map Making Guide
- Thread starter RipIt
- Start date
- Status
- Not open for further replies.
How to Download the Map Editor
By Ripit.
First go to the PT Map Editor download link thread: Official Pawn Tactics Map Editor Download Link
Click on the link that says Download.
Then this box will show up:
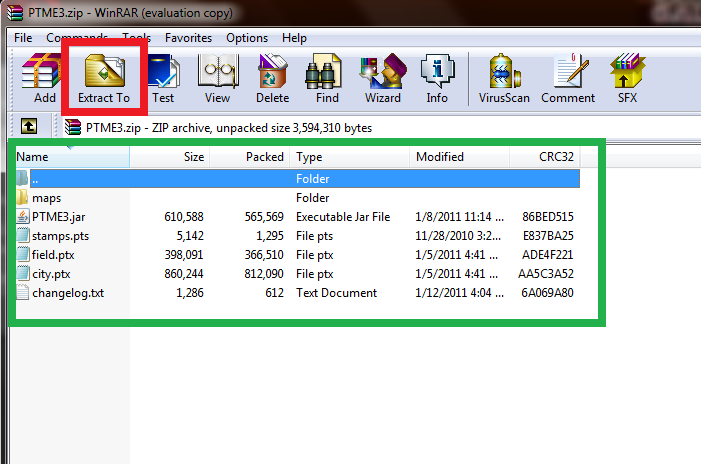
The next step is completely optional, but I would advise you do it in order to maintain organization on your desktop. I suggest creating a new folder somewhere called Pawn Tactics Map Making or PTMM or something of the sort. You don't have to, I'll explain steps later if you don't. I created a folder called PTMM on my desktop and extract all the files to it
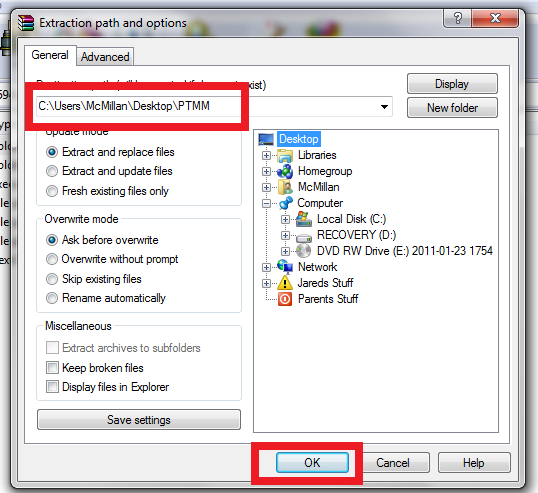
Once they are done extracting go to your desktop and open up your folder (If you didn't create a folder hang on a sec). You should see several files, click on PTME.jar. (You may have a newer version than the one in the screenshot.)

**If you didn't create a new folder just skip ahead and click on PTME3.jar
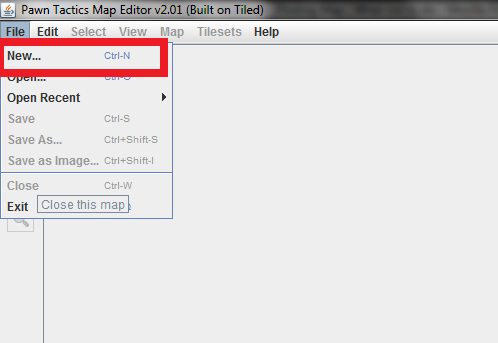
In the top left of your screen hit File>New to create your map
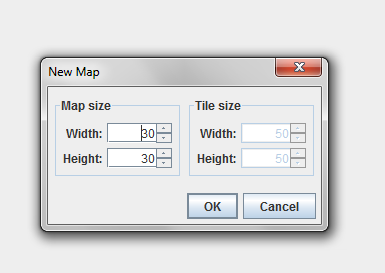
A window should pop up, this is where you can choose the size of your map. If you ever need to resize your map, simply click the Map tab and go to resize(Map>Resize)
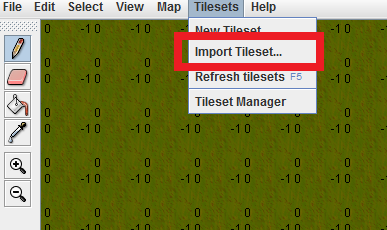
Then to import a tileset(City, Field or one of your own) simply click the tileset tab and choose import tileset(Tileset>Import)
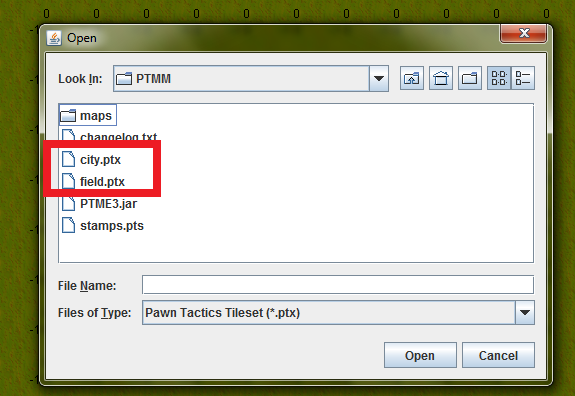
Go to the location of your tilesets and select them. They must be in the same folder as the map and as the map editor, otherwise it won't work.
New Video Guide!
By Ripit.
First go to the PT Map Editor download link thread: Official Pawn Tactics Map Editor Download Link
Click on the link that says Download.
Then this box will show up:
The next step is completely optional, but I would advise you do it in order to maintain organization on your desktop. I suggest creating a new folder somewhere called Pawn Tactics Map Making or PTMM or something of the sort. You don't have to, I'll explain steps later if you don't. I created a folder called PTMM on my desktop and extract all the files to it
Once they are done extracting go to your desktop and open up your folder (If you didn't create a folder hang on a sec). You should see several files, click on PTME.jar. (You may have a newer version than the one in the screenshot.)
**If you didn't create a new folder just skip ahead and click on PTME3.jar
In the top left of your screen hit File>New to create your map
A window should pop up, this is where you can choose the size of your map. If you ever need to resize your map, simply click the Map tab and go to resize(Map>Resize)
Then to import a tileset(City, Field or one of your own) simply click the tileset tab and choose import tileset(Tileset>Import)
Go to the location of your tilesets and select them. They must be in the same folder as the map and as the map editor, otherwise it won't work.
New Video Guide!
Last edited by a moderator:
Common Problems with the Map Editor
By Firstmate
Common Problems:
Before beginning to discuss common problems found, the file structure of the folder where the map editor is located should be similar to the following (-> means inside a folder. + means a folder. - means a file):
+PTmapEditor Folder
-> +maps
-> -> -Firefight.ptm
-> -> -Grimsby.ptm
-> -> -Metalworks.ptm
-> -> -Propaganda.ptm
-> -> -The Hexagon.ptm
-> -> -The Pyramid.ptm
-> -> -Trenches.ptm
-> -changelog.txt
-> -field.ptx
-> -PTME4.jar
Common Errors:
-- When trying to start a new map, you get this error:
-- You have no tileset
Similar to the above, you need to re-import field.ptx into the map editor. There are a few reasons for this error:
1.) You may have deleted field.ptx from the tileset manager and/or field.ptx was somehow deleted as a tileset. To fix this, go to Tilesets > Import Tileset > field.ptx (find the file wherever you may have saved it).
2.) You don't have field.ptx, in which follow the steps in the previous error to get field.ptx back.
--The PTME4.jar doesn't open the map editor
In order to open the map editor you must have Java installed.
--When I double-click PTME4.jar it opens a folder.
You need to download Java. Get the latest one here: https://java.com/
**If anyone has any other errors/fixes please tell me
By Firstmate
Common Problems:
Before beginning to discuss common problems found, the file structure of the folder where the map editor is located should be similar to the following (-> means inside a folder. + means a folder. - means a file):
+PTmapEditor Folder
-> +maps
-> -> -Firefight.ptm
-> -> -Grimsby.ptm
-> -> -Metalworks.ptm
-> -> -Propaganda.ptm
-> -> -The Hexagon.ptm
-> -> -The Pyramid.ptm
-> -> -Trenches.ptm
-> -changelog.txt
-> -field.ptx
-> -PTME4.jar
Common Errors:
-- When trying to start a new map, you get this error:
This error is caused when the field.ptx is not in the same folder as PTME4.jar To fix this issue, either redownload field.ptx or move field.ptx into the same folder as PTME4.jar"field.ptx(The system cannot find the file specified)"
-- You have no tileset
Similar to the above, you need to re-import field.ptx into the map editor. There are a few reasons for this error:
1.) You may have deleted field.ptx from the tileset manager and/or field.ptx was somehow deleted as a tileset. To fix this, go to Tilesets > Import Tileset > field.ptx (find the file wherever you may have saved it).
2.) You don't have field.ptx, in which follow the steps in the previous error to get field.ptx back.
--The PTME4.jar doesn't open the map editor
In order to open the map editor you must have Java installed.
--When I double-click PTME4.jar it opens a folder.
You need to download Java. Get the latest one here: https://java.com/
**If anyone has any other errors/fixes please tell me
Last edited by a moderator:
How to Use the Map Editor
By Knux57
1. Beginner Easy and necessary...
Getting Started
To start, you'll probably want to download the map editor if you haven't already. You can do so by clicking here. You might have to download the latest version of java if your computer doesn't already have it. Click here to download Java. For future reference, click here and scroll to the bottom of the page for the map tester; you may want to bookmark it. To use the map tester, you'll need to paste your map's code into it. To get the code, save your map in the PTME>Maps folder, then open up Notepad or Wordpad. In Notepad or Wordpad, open up the .ptm file for your map, and there should be a random series of numbers and letters, that's the code. Select all (ctrl+A), copy(ctrl+C), and paste (ctrl+V) the code into the map tester, and click Go. You must have at least 1 spawn in your map, or else you'll get a bad map data error message.
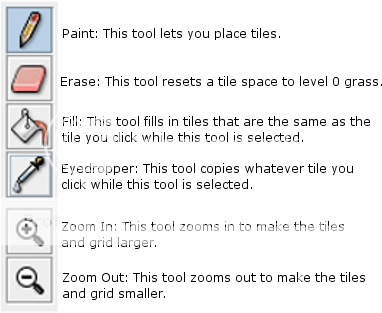
Tools
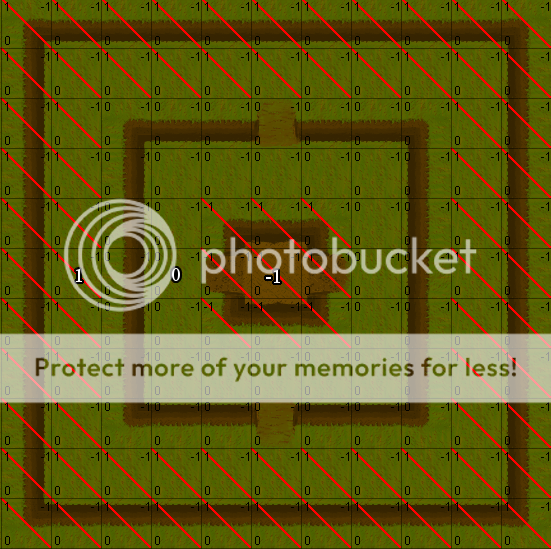
Slopes and Levels
Before you even touch levels, you should know what the slope tiles are. The picture below shows what tiles are slopes, and what their bordering tiles should be:
Levels are confusing. I don't get blank's logic when he said that the new map editor's height system is less confusing, but you'll have to cope like I did when adjusting to it. If this next pic doesn't help you, just keep testing your map until you can tell it works. Anyway, levels work like this: (The numbers in the pic resemble what level each part should be on)
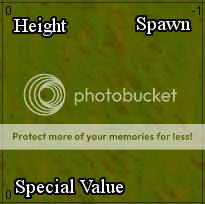
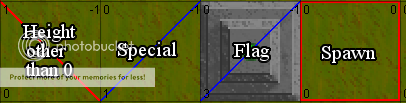
Tiles
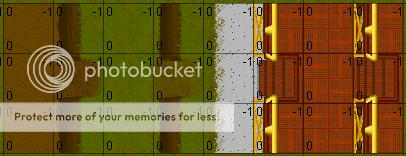
This next picture will illustrate what each of the numbers on each tile represents. The pic after that shows the different appearances of tiles and what they mean.
Spawns: To make a spawn, click the Spawn + button. How many times you click it changes the team that the spawn belongs to. 1 click = red, 2 clicks = blue, 3 = green, 4 = yellow, 5 = black, and 6 = white. Yes, there are black and white teams.
Special: Like making spawns, special tiles require that you click the Special + button a certain amount of times. Ignore special values 1-6, they make a tile a flag, which is standardized to the flag tiles. 7 clicks makes a victory zone tile for assault maps, 8-38 (even numbers) make normal capture zone for assault maps, and 9-39 (odd numbers) makes spawns that are originally blue spawns change to red spawns when a specific zone is captured. I will go more into detail with this in the Assault maps section later in the guide.
Naming a Map
I don't care if the name of a map isn't very important, it's just it is seriously killing me to see all these map names that make no sense, have nothing to do with the map, are just plain bad, etc..
Setting:
Analyze your map. What is the setting or overall theme of your map? Does it take place in a large pit like Gravedigger? Is it an invasion on a base like Conquest?
Spacing:
How cramped is your map? How open is it? If your map is close quarters like Death Sentence, name it based off of something to do with tight spaces. If it's more open like the old Dead Cross, name it something based off of something to do with open spaces.
Mode:
If you make a CTF map, don't name it something like "The Slaughterhouse", that's a deathmatch name. If you make an Assault map, make the name have something to do with an invasion, raid, etc..
Features:
If your map has a lot of lockers, crates, etc., you might think about naming it after a type of storage building. If there's a big hill or building in the center of the map, name it based off of that.
General:
•Avoid the use of "The" at the beginning of your map's name unless it makes it look weird without it. If you name a map "The City of War", it doesn't look nearly as good as "City of War".
•Don't make the name too long. It looks dumb if the name of the map is a full sentence. Keep it down to 1-3 words, including "of", "the", and other connecting words.
•Make sure the name has something to do with fighting, death, blood, war, chaos, or just overall violence!
•Be creative! You don't want to name your map something generic like "Battleground" or "Warzone", or definitely not a name of a map that has already been taken!
•You should only base your map's name off of 1 or 2 of these things, not all of them. Don't make it too hard on yourself.
Misc. Tips
•You'll definitely want to activate the grid feature before you make a map, as it is very useful for lining things up. Just press ctrl+G to toggle it on/off. If the grid is too dark for you, you can go to Edit on the map editor's toolbar and click Preferences, then click the Grid tab, and adjust the opacity of the grid. My preferred opacity is around 50%, which is in the middle of the adjust bar.
•The minimum map size is 20x15, which is the size of 1 screen on the 800x600 resolution. If you make a map smaller than 20x15, it'll glitch out, and wont be testable.
•20x15-30x30 is a small map, 40x40-50x50 is medium, and 60x60 and up is large. Dimension combos in between the given dimensions are small-medium and medium-large accordingly.
•A very annoying glitch that you'll find is when you copy a tile that is level -1 with the eyedropper, the copied version of the tile will automatically change its level to 5. You will have to change its level to -1 yourself.
•The cement walls w/barbed wire tiles are standardized to level 5, which makes them perfect for anti-grenade and spray barriers, and even borders of maps. This means that you don't have to set them on level 1 or whatever when you're placing them at higher elevations. Luckily, they also fit just about any theme you may be using.
•Scroll wheel click and drag on the map editor to be able to quickly scroll the screen in any direction.
•The more spawns for each team the better. It is a good tactic to eliminate spawn camping as much as possible.
2. Intermediate Gettin' good at this...
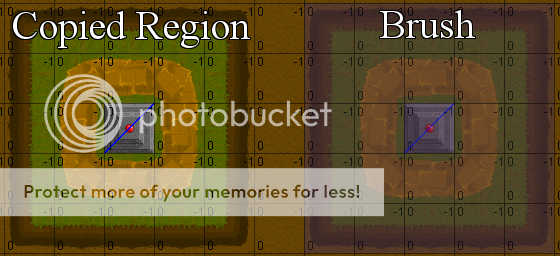
Region Copying
Region copying is one of the more obscure, but also one of the more helpful things in the new map editor. This feature lets you copy a whole area of tiles, so this can save you a lot of time when you know how to use it. On the downside, you cannot flip or rotate the copied region, so no, you can't make a 4-way ctf in 2 minutes. Anyway, to copy a region, all you need to do is right click, and then drag across the area you want to copy while still holding right click. If you just right click on a tile without moving to another tile, you can quickly copy a tile. One good and bad thing about this feature is that it transfers whatever level you currently have selected onto the tile that you start dragging from. The good thing about this is that you can actually transfer a level directly onto a tile. The bad part of this feature is exactly what I just said; you could do it on accident, because this is automatic.
Universal Map Tips (regardless of mode)
•Make sure teams can't spray too much. This can lead to very choppy and cheap gameplay, and overall annoyance. You especially want to make sure teams cannot spray into spawn areas.
•Spawn areas should always have quite a bit of defense to minimize spawn camping.
•There should be a "good" amount of space between bases. This means make it so you can't get to another team's base in 2 seconds, but also make sure it doesn't take 30 seconds. A good distance to try for is about 5-7 seconds, 8 and up is pushing it, but it might work.
Deathmatch Maps
Deathmatch, also known as Free For All, is an "every man for himself" mode. These kinds of maps can be asymmetrical (unbalanced layout), or symmetrical (balanced layout). For a Deathmatch map, I recommend you set the size of the map from anything 20x20-40x40, usually not as big as a Team Deathmatch, and definitely smaller than an Assault map. You also want to scatter the spawns around the map evenly, so all parts of the map are fought on (unless of course you want a specific part of the map to be the focus of the fighting). Make the spawns all the same team. A good example of what an FFA map should be like is The Pyramid, although I usually don't put too much of a height advantage on my FFA maps for fairness.
Team Deathmatch Maps
This mode is where the game has multiple teams in which players work together to kill the other teams. With that, you can tell that you'll want to make a TDM map symmetrical for balance most of the time. Each team should have their own base, and the spawn areas should USUALLY be pretty far away from each other between teams. I say usually because in some rare occasions, you could want to purposely put a few spawns for each team in the same area. The only time this has been used was on my old King of the Hill map, at the top of the hill. A good example of a TDM map is The Citadel, or for 4-way symmetry, Xing, which can be seen in my hall of maps. Fun Fact: For both Deathmatch and Team Deathmatch maps, you can actually put in "bonus zones", where people can race to capture at the beginning of a round for bonus points. This indeed HAS been confirmed to work in modes other than assault by a map that was SERVERED with this feature. The map was called "Hillsides".
Capture the Flag Maps
Capture the flag is slightly more tricky to make than a TDM or FFA map, because you ALWAYS want to make it symmetrical, you have to worry about how easy/hard it is to capture a flag for each team, and you'll also want to make multiple routes to each other team's base. A good example of what a CTF map should be like is Tactical Warfare, or for a 2-team CTF, Clash. Fun Fact: If you set the special tile value to a number 1-6, it will automatically turn into a flag tile in the map tester depending on what team you set it to.
King of the Hill Maps
King of the Hill (KOTH) is a new mode where each team competes for control over a capture zone (like in Assault maps) usually in the middle of the map. The hill can obviously be at a height advantage, but if you want to be creative, try making it more of a risk to capture the zone, for example, putting the zone in a pit where players going for the zone are at a height disadvantage, or maybe just plain no height advantage at all. As far as I can tell (I'm really not sure), all you do to make a hill zone is put a victory zone (+7 on the special + button) where you want the hill, then Blank handles the whole mode identification stuff (in case it only has 2 teams, in which case the map editor wouldn't be able to tell if it were an assault or not).
3. Pro Those hardest parts...
Assault Maps
Ever wonder how Assault maps work? Well you're about to find out! Assault maps, as the chapter states, are maps only pros can make. To start, you should set up an Assault map up asymmetrically, definitely. Usually, for a small assault, there's only 1-2 routes to take. But for a large assault, there can be several. A large assault can be extremely large, the Compound for example, was 80x80. Anyway, you should have an idea on how to design an Assault map, the real trick of Assault maps is the special tile values, which I will teach you.
Zones:
To make a zone, select a floor tile, and click the Special + button 8 times. This is the first zone. You don't have to have all the zone tiles connected to each other, which could actually make a very unique style of gameplay to your Assault map. Anyway, to make the second zone, you click the Special + button 10 times. Then for the third zone, click the button 12 times, and so on for the rest of the zones.
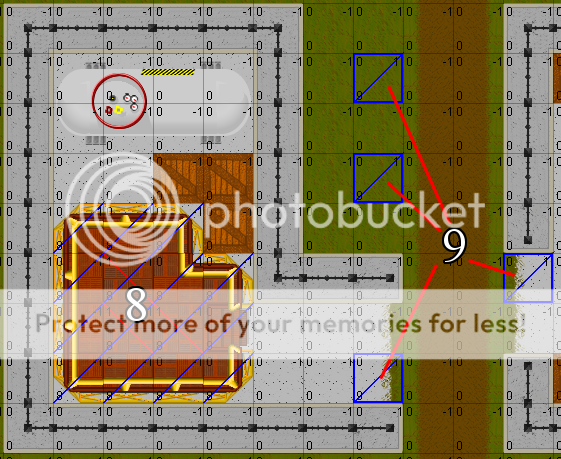
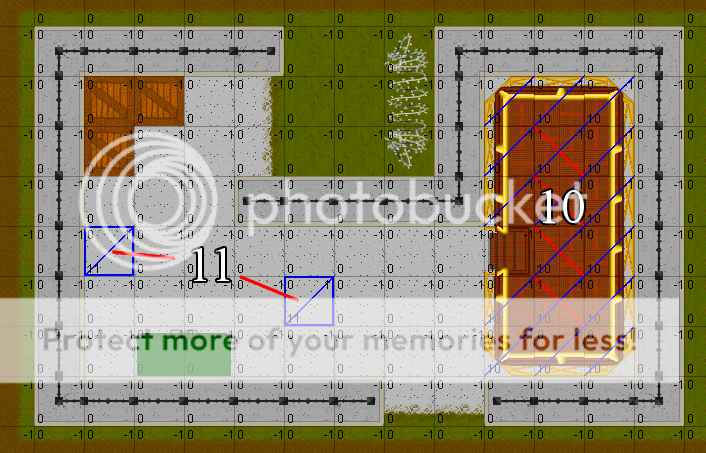
The Final Zone:
The final zone is different from the others in value. Instead of clicking the Special + button the number of times equal to the next even number after the semi-final zone like the rest of the zones, you only have to click 7 times. Make sure you remember this.
Blue to Red Spawns:
This part is a bit more confusing. First, make a blue spawn. Then set its value to the odd number that follows the zone that needs to be captured in order for it to convert to red. For example, the first zone's value is 8, so then the value for a convert spawn is 9. So when the reds capture the first zone, whatever tiles have a special value of 9 become red spawns. I'm not sure if the tiles actually have to be blue spawns before they turn into red spawns, meaning that a tile with the special value of 9, but they usually are. Yeah, pretty hard to explain in words, so here's a few pics:
6-Team Turmoil
You heard right, 6-teams. As stated before in the Tiles section, maps can have up to 6 teams. The last 2 teams are black and white. There are only 2 maps that have had 6 teams, one of which was servered. The Hexagon was the first 6-team CTF, and was servered (and then deservered), and Rumble was the first 6-team TDM, and first 6-team map in general. 6-Team maps are insanely hard to set up. First you have to worry about balance, then you have to worry about if the teams in the inevitable "middle" will be teamed up on, which is not good. To help out with setting up a 6-team map, here's a pic of what Rumble looks like:
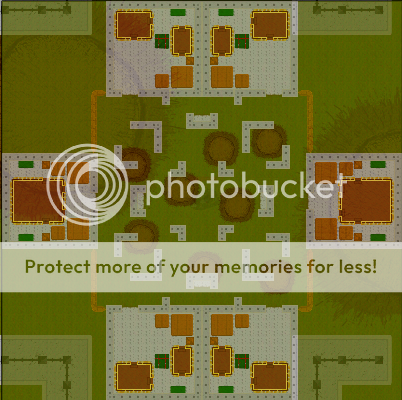
Notice how there is about an equal distance between the exits of each team's base. Try to go for that sort of effect as well as you can.
Water Tiles
Since the new editor came out with its standardized tiles, it's been tough work trying to make crazy tiles. After a while of map making, I've finally figured out a way to make water! Of course, none of the tiles currently in the field tileset look like they'd be anywhere near water, you can still try to make it work. To make water tiles, just make a grass or dirt tile with a capture zone on it. Of course, to make it look like water, you'll want to make it in large bodies. Make absolute sure nobody can actually capture the zone, or else the "water" will "evaporate", which looks insanely choppy. I prefer using grass tiles for water, as it makes a more blue color. Dirt tiles make somewhat of a dark indigo color, which can make it look deeper. Here is an example of what water can look like on a map, specifically what it looks like on my map, Tidal War:
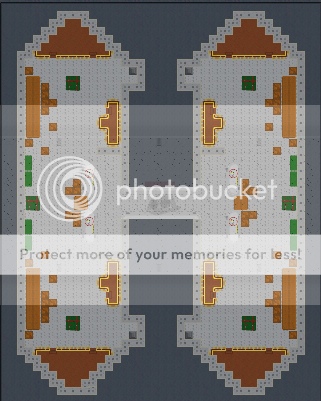
As you can see, I went for more of a boat effect on the map. I think making a river going across the map would probably look better, but I haven't tried it yet.
Making Your Own Tilesets
A new trend of making your own tiles has suddenly grown recently. To make a tileset, you not only need to be a good artist, but you also have to make sure you know how to actually make the tileset file. Here's what you gotta do:
1. Create your tiles (each tile must be 50x50). Make sure they look like they'd be in PT, not Halo (Cartoony kind of).
2. In the Map Editor, create a new map of any size.
3. Click on Tilesets up on the toolbar, and then New Tileset.
4. Enter your tileset's name and click OK.

4. Once you click OK, you will get a blank, tileless map. Now you have to click Tilesets on the toolbar again and this time click Tileset Manager.
5. There should be a column of icons on the right side of the box. Click the bottom icon called Edit.

6. Click on the Images tab, and click Add Images. Find the image files of each the tiles you made earlier.
7. Once you're done uploading all the tiles, select your default ground tile (like the grass tile in the field tileset), and click Create Tiles.
8. After you've gotten your default ground tile made, then you can upload the rest of the tiles. Make sure you upload them in sets (such as a set of slope tiles) so it isn't confusing on the tile palette.
9. Now that your tiles are all on the palette, you have to give them properties. Go back to the Tiles tab and add all the correct properties by double clicking each category. This will be a tedious process. Double click the box under the Value column to edit the property.
10. After you're done putting in all the properties, click OK and then the top icon to save.
 The file should automatically have been selected as a .ptx file.
11. Now that you've saved, close and reopen the Map Editor and click Tilesets, and then Import Tileset. Find your tileset's .ptx file and open it up. Congratulations, you've made your very own tileset. If you ever want to make edits to a specific tile, just make the edited version of the tile and upload it to the Images tab as usual. Then go to the Tiles tab and select the tile you're editing, and click Change Image. Select the edited version of the tile.
Here's a list of each kind of tile and what their properties should be (if you have them at the same default rotation as the ones in the field tileset):
Common
Floor
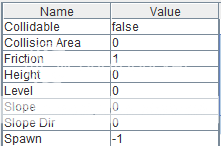

Collidible Floor
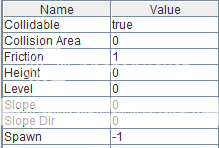

Same-Level Cover
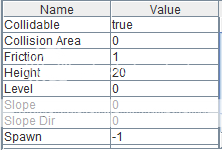

Slope
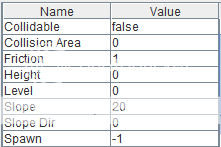

Slope Wall
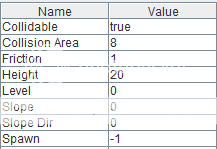

Slope Outer Corner
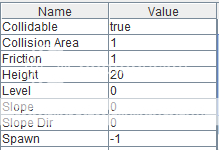

Slope Inner Corner
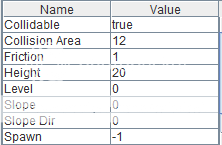

Spray-Proof Wall
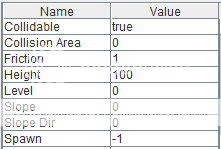

Flag (You have to scroll down to get the Special property)
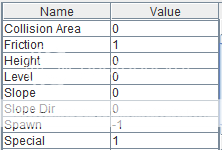
Rare
Floor that slows you down (if you put 0 as the friction value, it will make whoever steps on the tile get stuck, and if you put anything more than 1, it will make you go faster)
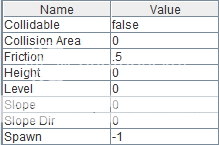
Outer Diagonal Slope
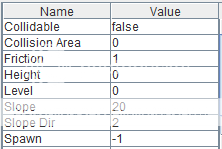

Inner Diagonal Slope
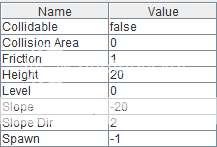

You can also go to the Tileset Manager of the field tiles if you need any other information.
By Knux57
1. Beginner Easy and necessary...
Getting Started
To start, you'll probably want to download the map editor if you haven't already. You can do so by clicking here. You might have to download the latest version of java if your computer doesn't already have it. Click here to download Java. For future reference, click here and scroll to the bottom of the page for the map tester; you may want to bookmark it. To use the map tester, you'll need to paste your map's code into it. To get the code, save your map in the PTME>Maps folder, then open up Notepad or Wordpad. In Notepad or Wordpad, open up the .ptm file for your map, and there should be a random series of numbers and letters, that's the code. Select all (ctrl+A), copy(ctrl+C), and paste (ctrl+V) the code into the map tester, and click Go. You must have at least 1 spawn in your map, or else you'll get a bad map data error message.
Tools
Slopes and Levels
Before you even touch levels, you should know what the slope tiles are. The picture below shows what tiles are slopes, and what their bordering tiles should be:
Levels are confusing. I don't get blank's logic when he said that the new map editor's height system is less confusing, but you'll have to cope like I did when adjusting to it. If this next pic doesn't help you, just keep testing your map until you can tell it works. Anyway, levels work like this: (The numbers in the pic resemble what level each part should be on)
Tiles
This next picture will illustrate what each of the numbers on each tile represents. The pic after that shows the different appearances of tiles and what they mean.
Spawns: To make a spawn, click the Spawn + button. How many times you click it changes the team that the spawn belongs to. 1 click = red, 2 clicks = blue, 3 = green, 4 = yellow, 5 = black, and 6 = white. Yes, there are black and white teams.
Special: Like making spawns, special tiles require that you click the Special + button a certain amount of times. Ignore special values 1-6, they make a tile a flag, which is standardized to the flag tiles. 7 clicks makes a victory zone tile for assault maps, 8-38 (even numbers) make normal capture zone for assault maps, and 9-39 (odd numbers) makes spawns that are originally blue spawns change to red spawns when a specific zone is captured. I will go more into detail with this in the Assault maps section later in the guide.
Naming a Map
I don't care if the name of a map isn't very important, it's just it is seriously killing me to see all these map names that make no sense, have nothing to do with the map, are just plain bad, etc..
Setting:
Analyze your map. What is the setting or overall theme of your map? Does it take place in a large pit like Gravedigger? Is it an invasion on a base like Conquest?
Spacing:
How cramped is your map? How open is it? If your map is close quarters like Death Sentence, name it based off of something to do with tight spaces. If it's more open like the old Dead Cross, name it something based off of something to do with open spaces.
Mode:
If you make a CTF map, don't name it something like "The Slaughterhouse", that's a deathmatch name. If you make an Assault map, make the name have something to do with an invasion, raid, etc..
Features:
If your map has a lot of lockers, crates, etc., you might think about naming it after a type of storage building. If there's a big hill or building in the center of the map, name it based off of that.
General:
•Avoid the use of "The" at the beginning of your map's name unless it makes it look weird without it. If you name a map "The City of War", it doesn't look nearly as good as "City of War".
•Don't make the name too long. It looks dumb if the name of the map is a full sentence. Keep it down to 1-3 words, including "of", "the", and other connecting words.
•Make sure the name has something to do with fighting, death, blood, war, chaos, or just overall violence!
•Be creative! You don't want to name your map something generic like "Battleground" or "Warzone", or definitely not a name of a map that has already been taken!
•You should only base your map's name off of 1 or 2 of these things, not all of them. Don't make it too hard on yourself.
Misc. Tips
•You'll definitely want to activate the grid feature before you make a map, as it is very useful for lining things up. Just press ctrl+G to toggle it on/off. If the grid is too dark for you, you can go to Edit on the map editor's toolbar and click Preferences, then click the Grid tab, and adjust the opacity of the grid. My preferred opacity is around 50%, which is in the middle of the adjust bar.
•The minimum map size is 20x15, which is the size of 1 screen on the 800x600 resolution. If you make a map smaller than 20x15, it'll glitch out, and wont be testable.
•20x15-30x30 is a small map, 40x40-50x50 is medium, and 60x60 and up is large. Dimension combos in between the given dimensions are small-medium and medium-large accordingly.
•A very annoying glitch that you'll find is when you copy a tile that is level -1 with the eyedropper, the copied version of the tile will automatically change its level to 5. You will have to change its level to -1 yourself.
•The cement walls w/barbed wire tiles are standardized to level 5, which makes them perfect for anti-grenade and spray barriers, and even borders of maps. This means that you don't have to set them on level 1 or whatever when you're placing them at higher elevations. Luckily, they also fit just about any theme you may be using.
•Scroll wheel click and drag on the map editor to be able to quickly scroll the screen in any direction.
•The more spawns for each team the better. It is a good tactic to eliminate spawn camping as much as possible.
2. Intermediate Gettin' good at this...
Region Copying
Region copying is one of the more obscure, but also one of the more helpful things in the new map editor. This feature lets you copy a whole area of tiles, so this can save you a lot of time when you know how to use it. On the downside, you cannot flip or rotate the copied region, so no, you can't make a 4-way ctf in 2 minutes. Anyway, to copy a region, all you need to do is right click, and then drag across the area you want to copy while still holding right click. If you just right click on a tile without moving to another tile, you can quickly copy a tile. One good and bad thing about this feature is that it transfers whatever level you currently have selected onto the tile that you start dragging from. The good thing about this is that you can actually transfer a level directly onto a tile. The bad part of this feature is exactly what I just said; you could do it on accident, because this is automatic.
Universal Map Tips (regardless of mode)
•Make sure teams can't spray too much. This can lead to very choppy and cheap gameplay, and overall annoyance. You especially want to make sure teams cannot spray into spawn areas.
•Spawn areas should always have quite a bit of defense to minimize spawn camping.
•There should be a "good" amount of space between bases. This means make it so you can't get to another team's base in 2 seconds, but also make sure it doesn't take 30 seconds. A good distance to try for is about 5-7 seconds, 8 and up is pushing it, but it might work.
Deathmatch Maps
Deathmatch, also known as Free For All, is an "every man for himself" mode. These kinds of maps can be asymmetrical (unbalanced layout), or symmetrical (balanced layout). For a Deathmatch map, I recommend you set the size of the map from anything 20x20-40x40, usually not as big as a Team Deathmatch, and definitely smaller than an Assault map. You also want to scatter the spawns around the map evenly, so all parts of the map are fought on (unless of course you want a specific part of the map to be the focus of the fighting). Make the spawns all the same team. A good example of what an FFA map should be like is The Pyramid, although I usually don't put too much of a height advantage on my FFA maps for fairness.
Team Deathmatch Maps
This mode is where the game has multiple teams in which players work together to kill the other teams. With that, you can tell that you'll want to make a TDM map symmetrical for balance most of the time. Each team should have their own base, and the spawn areas should USUALLY be pretty far away from each other between teams. I say usually because in some rare occasions, you could want to purposely put a few spawns for each team in the same area. The only time this has been used was on my old King of the Hill map, at the top of the hill. A good example of a TDM map is The Citadel, or for 4-way symmetry, Xing, which can be seen in my hall of maps. Fun Fact: For both Deathmatch and Team Deathmatch maps, you can actually put in "bonus zones", where people can race to capture at the beginning of a round for bonus points. This indeed HAS been confirmed to work in modes other than assault by a map that was SERVERED with this feature. The map was called "Hillsides".
Capture the Flag Maps
Capture the flag is slightly more tricky to make than a TDM or FFA map, because you ALWAYS want to make it symmetrical, you have to worry about how easy/hard it is to capture a flag for each team, and you'll also want to make multiple routes to each other team's base. A good example of what a CTF map should be like is Tactical Warfare, or for a 2-team CTF, Clash. Fun Fact: If you set the special tile value to a number 1-6, it will automatically turn into a flag tile in the map tester depending on what team you set it to.
King of the Hill Maps
King of the Hill (KOTH) is a new mode where each team competes for control over a capture zone (like in Assault maps) usually in the middle of the map. The hill can obviously be at a height advantage, but if you want to be creative, try making it more of a risk to capture the zone, for example, putting the zone in a pit where players going for the zone are at a height disadvantage, or maybe just plain no height advantage at all. As far as I can tell (I'm really not sure), all you do to make a hill zone is put a victory zone (+7 on the special + button) where you want the hill, then Blank handles the whole mode identification stuff (in case it only has 2 teams, in which case the map editor wouldn't be able to tell if it were an assault or not).
3. Pro Those hardest parts...
Assault Maps
Ever wonder how Assault maps work? Well you're about to find out! Assault maps, as the chapter states, are maps only pros can make. To start, you should set up an Assault map up asymmetrically, definitely. Usually, for a small assault, there's only 1-2 routes to take. But for a large assault, there can be several. A large assault can be extremely large, the Compound for example, was 80x80. Anyway, you should have an idea on how to design an Assault map, the real trick of Assault maps is the special tile values, which I will teach you.
Zones:
To make a zone, select a floor tile, and click the Special + button 8 times. This is the first zone. You don't have to have all the zone tiles connected to each other, which could actually make a very unique style of gameplay to your Assault map. Anyway, to make the second zone, you click the Special + button 10 times. Then for the third zone, click the button 12 times, and so on for the rest of the zones.
The Final Zone:
The final zone is different from the others in value. Instead of clicking the Special + button the number of times equal to the next even number after the semi-final zone like the rest of the zones, you only have to click 7 times. Make sure you remember this.
Blue to Red Spawns:
This part is a bit more confusing. First, make a blue spawn. Then set its value to the odd number that follows the zone that needs to be captured in order for it to convert to red. For example, the first zone's value is 8, so then the value for a convert spawn is 9. So when the reds capture the first zone, whatever tiles have a special value of 9 become red spawns. I'm not sure if the tiles actually have to be blue spawns before they turn into red spawns, meaning that a tile with the special value of 9, but they usually are. Yeah, pretty hard to explain in words, so here's a few pics:
6-Team Turmoil
You heard right, 6-teams. As stated before in the Tiles section, maps can have up to 6 teams. The last 2 teams are black and white. There are only 2 maps that have had 6 teams, one of which was servered. The Hexagon was the first 6-team CTF, and was servered (and then deservered), and Rumble was the first 6-team TDM, and first 6-team map in general. 6-Team maps are insanely hard to set up. First you have to worry about balance, then you have to worry about if the teams in the inevitable "middle" will be teamed up on, which is not good. To help out with setting up a 6-team map, here's a pic of what Rumble looks like:
Notice how there is about an equal distance between the exits of each team's base. Try to go for that sort of effect as well as you can.
Water Tiles
Since the new editor came out with its standardized tiles, it's been tough work trying to make crazy tiles. After a while of map making, I've finally figured out a way to make water! Of course, none of the tiles currently in the field tileset look like they'd be anywhere near water, you can still try to make it work. To make water tiles, just make a grass or dirt tile with a capture zone on it. Of course, to make it look like water, you'll want to make it in large bodies. Make absolute sure nobody can actually capture the zone, or else the "water" will "evaporate", which looks insanely choppy. I prefer using grass tiles for water, as it makes a more blue color. Dirt tiles make somewhat of a dark indigo color, which can make it look deeper. Here is an example of what water can look like on a map, specifically what it looks like on my map, Tidal War:
As you can see, I went for more of a boat effect on the map. I think making a river going across the map would probably look better, but I haven't tried it yet.
Making Your Own Tilesets
A new trend of making your own tiles has suddenly grown recently. To make a tileset, you not only need to be a good artist, but you also have to make sure you know how to actually make the tileset file. Here's what you gotta do:
1. Create your tiles (each tile must be 50x50). Make sure they look like they'd be in PT, not Halo (Cartoony kind of).
2. In the Map Editor, create a new map of any size.
3. Click on Tilesets up on the toolbar, and then New Tileset.
4. Enter your tileset's name and click OK.
4. Once you click OK, you will get a blank, tileless map. Now you have to click Tilesets on the toolbar again and this time click Tileset Manager.
5. There should be a column of icons on the right side of the box. Click the bottom icon called Edit.
6. Click on the Images tab, and click Add Images. Find the image files of each the tiles you made earlier.
7. Once you're done uploading all the tiles, select your default ground tile (like the grass tile in the field tileset), and click Create Tiles.
8. After you've gotten your default ground tile made, then you can upload the rest of the tiles. Make sure you upload them in sets (such as a set of slope tiles) so it isn't confusing on the tile palette.
9. Now that your tiles are all on the palette, you have to give them properties. Go back to the Tiles tab and add all the correct properties by double clicking each category. This will be a tedious process.
Double click the box under the Value column to edit the property.10. After you're done putting in all the properties, click OK and then the top icon to save.
11. Now that you've saved, close and reopen the Map Editor and click Tilesets, and then Import Tileset. Find your tileset's .ptx file and open it up. Congratulations, you've made your very own tileset. If you ever want to make edits to a specific tile, just make the edited version of the tile and upload it to the Images tab as usual. Then go to the Tiles tab and select the tile you're editing, and click Change Image. Select the edited version of the tile.
Here's a list of each kind of tile and what their properties should be (if you have them at the same default rotation as the ones in the field tileset):
Common
Floor
Collidible Floor
Same-Level Cover
Slope
Slope Wall
Slope Outer Corner
Slope Inner Corner
Spray-Proof Wall
Flag (You have to scroll down to get the Special property)
Rare
Floor that slows you down (if you put 0 as the friction value, it will make whoever steps on the tile get stuck, and if you put anything more than 1, it will make you go faster)
Outer Diagonal Slope
Inner Diagonal Slope
You can also go to the Tileset Manager of the field tiles if you need any other information.
Last edited by a moderator:
How to Save Your Map
By Alex
Now that you've created your map you're going to want to save it.
Click File.
Click Save.

Type in your map name in the 'File Name' field.
Choose a good spot where you'll remember.
Click Save,

This will create a ptm file. When you're ready to share the map just attach this file into your thread.

By Alex
Now that you've created your map you're going to want to save it.
Click File.
Click Save.
Type in your map name in the 'File Name' field.
Choose a good spot where you'll remember.
Click Save,
This will create a ptm file. When you're ready to share the map just attach this file into your thread.
Last edited:
How to Post Your Map
By SmoothCopyCat
Starting off, there are mutiple ways to post your map.
This would be, that I find, the easiest way.
Looking at your finished masterpiece, Go to "File" then "Save as Image"
You'll get a pop up screen.
Next, you gotta name your map!
Next, you have to open up "Paint" then click "File" then "Open"
Once you click "Open" then locate your file then click "Open" again.
Once your map shows up, click "Save As" and save to a location you can remember, BUT, make sure your map is cropped correctly, and there isn't an excess of blank space.
After you have your map saved, open up either Imgur (or any other photo uploading place your comfortable with) but for my sake, im going to show you imguir. Once you have Imgur opened, click new post and then "Choose Photo/Video" and locate your map again.
Once you locate your map, click "Open,"
Once your map finishes uploading, click "Copy link".
Now paste the link into your thread.
Now, to post your code. (If you so choose so)
First, open up notepad.
Then "File" then "Open" and locate your map name.
Click "Text Documents (*.txt)" and change it to "All files" in the drop down.
Then locate your map name.
Open.
Yes, this really long code will appear..
Right click, select all, then right click and copy.
then paste this long code within thread using the insert code function.
EX:
Always make sure you "Preview Post" before you "Submit New Thread" to make sure your thread is the way you like it, and well, have fun and enjoy the maps you make.
If your going to include them when you post your map (which is better, cause it makes it easier to test and easier to get servered), put it inside a spolier, as to keep the thread clean.
[spoiler][code]Code here[/code][/spoiler]
By SmoothCopyCat
Starting off, there are mutiple ways to post your map.
This would be, that I find, the easiest way.
Looking at your finished masterpiece, Go to "File" then "Save as Image"
You'll get a pop up screen.
Next, you gotta name your map!
Next, you have to open up "Paint" then click "File" then "Open"
Once you click "Open" then locate your file then click "Open" again.
Once your map shows up, click "Save As" and save to a location you can remember, BUT, make sure your map is cropped correctly, and there isn't an excess of blank space.
After you have your map saved, open up either Imgur (or any other photo uploading place your comfortable with) but for my sake, im going to show you imguir. Once you have Imgur opened, click new post and then "Choose Photo/Video" and locate your map again.
Once you locate your map, click "Open,"
Once your map finishes uploading, click "Copy link".
Now paste the link into your thread.
Now, to post your code. (If you so choose so)
First, open up notepad.
Then "File" then "Open" and locate your map name.
Click "Text Documents (*.txt)" and change it to "All files" in the drop down.
Then locate your map name.
Open.
Yes, this really long code will appear..
Right click, select all, then right click and copy.
then paste this long code within thread using the insert code function.
EX:
Code:
45&45&field&&0,0$101,2112,0,0^1,0Always make sure you "Preview Post" before you "Submit New Thread" to make sure your thread is the way you like it, and well, have fun and enjoy the maps you make.
If your going to include them when you post your map (which is better, cause it makes it easier to test and easier to get servered), put it inside a spolier, as to keep the thread clean.
[spoiler][code]Code here[/code][/spoiler]
Last edited by a moderator:
Posting Your Map Thread
By Villyer
When you post your map, refrain from tagging your name in the title. If you're posting someone else's map or it is a colllaboration, list the authors in the thread body.
Please try to use spoilers to hide large pictures.
Your thread titles should note basic information of the map, such as "[(# of teamsT) - (Game mode)] Title of Map [CITY/FIELD]
Some examples:
[4T-TDM] Citadel [F]
[2T-CTF] Locked Inside [F]
Last edited by a moderator:
- Status
- Not open for further replies.